
Long gone are the days when you had to learn code to build beautiful, professional websites. WordPress plugins can help you do almost anything you can imagine, without learning any HTML, CSS, or Javascript.
While I like to tinker around with HTML and CSS, I understand how intimidating it can appear. If you don’t have loads of time or money (for classes) to learn any code, there is another solution: Use a page builder!
In this post, I’m going to talk about page builders and how they work. They will allow you to easily build a professional web page without learning a drop of code. Using a page builder will help you take your DIY WordPress blog to another level, fast and easy.


*This post contains affiliate links. That means that if you make a purchase after clicking on a link I may earn a small commission at no extra cost to you. For more information, click here.
What is a Page Builder?
A page builder is a plugin that often uses a drag-and-drop editor to design a web page. Every blog post you write could be designed using one if you choose.
I prefer to only use a page builder for specific pages or sections on my blog. My “Home” and “About Me” pages are two examples. I currently use two page builders; Elementor Page Builder by Elementor and Page Builder by Site Origin.
The SiteOrigin Page Builder was recommended for use with my theme. I typically only use it to add widgets to blog posts. Elementor is much more user-friendly, especially for beginners. I have used it to build pages on this site and others with great results.
Both page builders make use of your existing plugins and widgets, in addition to formatting your pages any way you like. In this post, I will demonstrate how I use both of these page builders to improve the function and appearance of my blog.
Before You Begin
The first thing I recommend you do is download and install the plugins, Elemementor Page Builder by Elementor and Page Builder by Site Origin. In your WordPress dashboard, under Plugins > Add New, then search for “page builder” and these page builders will appear in the search results.
Below is a graphic of which page builders you will install.

Go ahead and click the “Install Now” button, then “Activate” each plugin once it is installed.
Create a New Page
Once you have installed and activated the page builders, go to Pages > Add New on your WordPress sidebar menu.
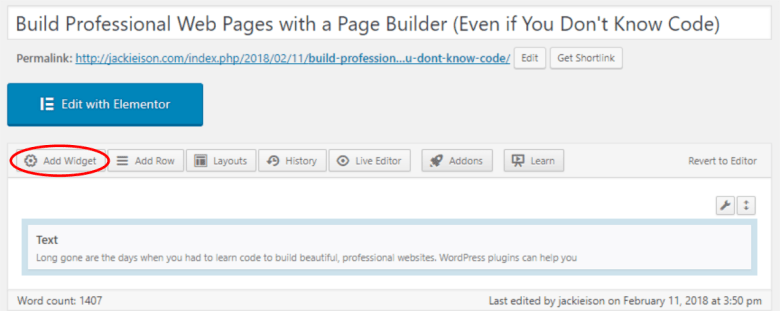
If you have created pages in the past, you will notice the page builder changes, as circled below.

The big blue button is used for the Elementor Page Builder and the tab controls the SiteOrigin Page Builder. Click on the blue “Edit with Elementor” button to get started creating your page.
Once it loads, you will see your website’s banner and the sidebar, if you have one. Scroll down until you see the following box.

Insert a Template
You can either add a section from the left sidebar of the Elementor dashboard or click “Add Template.” For now, click “Add Template.” You will now see all of the awesome Templates that Elementor offers on this page.
For the free plugin, you can’t use any of the PRO templates. However, if you choose to go PRO, the price is a reasonable $49 for a single site or $99 for three. PRO also includes additional widgets to give you more customization options.
I will use a free template called, “Product – Clean” for this post.
Once you select, then “Insert” the template, you will see it exactly as it will appear on your website. On the left of the screen will be the Elementor dashboard. This shows Elementor’s widgets as well as your blog’s plugins and widgets.
If you hover over an element of the template, you will notice the element is outlined and a small blue box with a pencil and line appears in the top, right corner, as seen below.

Place your cursor over, but don’t click, the blue box and it will expand the menu of this element, as seen below.

The “X” button will delete the element, the button with two boxes will duplicate or copy it, and the pencil and line will edit it. Since I don’t want to keep the Elementor Logo, I’m going to click “X” to delete it.
Next, scroll down to the text section (or widget) right below the image of the computer. Click on the “Edit” button when you hover over the widget. Now, you will see your options for that widget in the Elementor dashboard in the left sidebar, as seen below:

As you can see, the content of the text widget appears in the sidebar. From here, you can edit it in any way that you need. If you look above the text editor, you will notice there are three options to edit this widget. These are; Content, Style, and Advanced.
Explore Your Widgets
I recommend that you play around with your options in these boxes. Each widget will have its own unique options, so familiarize yourself with them. Don’t be afraid to try something new or different. You can always delete the widget and start again.
Once you are happy with your changes, you can publish or save your changes. To do this, simply click the green “Publish” button at the bottom of Elementor’s control sidebar or click the up-arrow to the right of it. This will give you the option to save as a draft or as a template.
If you love a page’s appearance, saving it as a template will allow you to copy the layout and design to future pages. This is great for building your brand. It helps you develop a unique style and brand continuity. To use the template in the future, you simply have to click on the “Your Templates” tab when you are viewing templates.
View How Your Page Will Appear
While you are able to see a live preview from your PC, you may be curious as to how a page will appear on a tablet or mobile device. The majority of my audience view my blog from a mobile device these days. This is true for most bloggers, so the responsiveness of the design is very important.
To check this, click on the little television or computer monitor shaped icon to the left of the Publish button in the grey box. As you can see, you can view your changes on any device.

This is one of my favorite features of Elementor. It allows me to view my blog exactly as my audience will see it, while I edit. This will make your life much easier as you create and edit your pages and content.
Publish Your Page
If you are satisfied with how your page appears, make sure to save it as a draft or publish it. First, click on the green “Publish” button at the bottom of your screen.
Once you have “Published” the page, it won’t go live until you Publish from the WordPress Page’s Publisher box. To return to the WordPress page, click on the three lines at the top, left of the sidebar, as circled below. This is the Elementor Menu.

Once you click on them, you will see a drop-down menu. Select the “Exit to Dashboard” blue button and you will be taken back to your WordPress Dashboard page. Don’t freak out, because you won’t be able to see your work. Don’t worry, it’s still there.
Your Page will look like the following image.

From here, you can choose to “Save Draft” if you wish to work on it later or “Publish” for the page to go live. If you decide to make any changes in the future, all you have to do is click the “Edit with Elementor” button.
Congratulations on Your New Page!
Now, if you are like me once you’ve learned a new skill, you do a happy dance. At this point, my cats would be looking at me like I’ve lost my mind. Little do they know, that happened many moons ago.
That is all you have to do to create an amazing, beautiful, and professional web page using a page builder in WordPress!
SiteOrigin
Remember I had you to install the SiteOrigin Page Builder? Here is where I am going to discuss how you can use it to add to your blog posts or web pages.
My theme, which is currently Flash by ThemeGrill, doesn’t give me the option to have multiple footers. That means that any widgets that I need to insert before or after a post, have to be added manually or by a page builder.
This is where I use the SiteOrigin Page Builder. In this example, I will show you how to add a widget after this blog posts.
The first thing you need to do is locate the “Page Builder” tab above your text editor, as seen below and click on it.

You will see a “Text” box in the text editor. This box contains all of the content from your blog post. The Page Builder will allow you to insert widgets before or after your post’s content.
From here, you can see that you have several options, including a live view. Live view is similar in appearance to the Elementor page builder, but not as user-friendly. For this reason, I will simply forgo the live view.
Adding Widgets
I recommend simply adding widgets to your post, using the “Add Widget” button, located on the far left, above the text box, as seen below.
Once you click on it, you will see the following screen, which includes all of your blog’s widget plugins as well as those from the SiteOrigin plugin. You also have the option to download a Widgets Bundle at the bottom, if you would prefer.

Since I like to insert a list of other blog posts from within the same category at the end of the post, I will select the “Category Posts” widget. This will allow me to insert the widget and edit it as I would in a sidebar or menu under the WordPress dashboards “Appearance” settings.
Once you add a widget, it takes you back to the page builder menu screen with the “Text” box. As you can see below, the widget has been added below the text. If you want it to appear above the text, you can simply click-and-drag it to the location you prefer.

On this screen, click the “Edit” link in the widget’s box. This will allow you to select from the options that your widget offers. This is all that you have to do to add a new element to your posts and it only takes minutes.
Save Your Work
Once you have edited the widget, click “Save Draft” in the Publish box on your left to save your work. If you leave the editor without saving your work, it will be lost.
After you have saved the post, you can click “Revert to Editor” to return to the WordPress Editor for your post. Under the “Visual” tab above the textbox, you will see a tag created by the page builder in your text. This is what will allow your post to display the widget.
Don’t edit this text. If you do, your widget will not display properly. In order to see what it will look like when the post goes live, click the “Preview” button in the post’s Publish box at the top-right. You will notice the widget will display where you have designated for it to do so.
Publish and Admire Your New Page
Once you have used the preview and ensured that everything is as you expected, publish or schedule your post. That’s it. You now have the power of a page builder to make your blog more custom and professional.
You don’t have to learn complicated code to have a beautiful, professional web page or blog post. Page builders can help you fully customize all of the pages on your blog much more quickly than learning HTML, CSS, and JavaScript.
More Information on Page Builders
There are so many features and uses for page builders on your blog that it’s hard to cover it all in a single blog post. If you want to get to know Elementor better, this tutorial will show you how to start a website from scratch and design it with Elementor.
If you already have your blog, skip forward about 23 minutes to get to the section about Elementor. It is three hours long, but it does have sections marked in the comments so you can go directly to the parts that you are interested in.
SiteOrigin’s Page Builder has very useful features that I have yet to explore. If you want to explore this page builder in more detail, this tutorial is a great place to start.
Which Page Builder Do You Prefer?
Do you use Elementor or SiteOrigin’s Page Builders? Or do you prefer a page builder other than Elementor or SiteOrigin? What are your favorite features and advice? Please let us know in the comments. I would love to get your feedback.
Before you leave, make sure to sign up for the newsletter here in order to get updates about future posts as they become available. Also, check out the posts below.
New posts go live on Monday and on Thursday, I publish a Q&A Thursday post as well. Thank you for reading!


larfrid baf94a4655 https://trello.com/c/C5Gz60OL/106-descargar-cast-combat-alchemy-solution-and-tactics-versi%C3%B3n-pirateada-2022
edefyl baf94a4655 https://trello.com/c/4WPZF2xq/48-second-hand-frankies-revenge-versi%C3%B3n-pirateada
amadham baf94a4655 https://www.guilded.gg/vaiccutethurs-Buffaloes/overview/news/16n9meBl
heakal baf94a4655 https://www.guilded.gg/eceramtrans-Thunderbirds/overview/news/jyPM8obR
yudell baf94a4655 https://www.guilded.gg/mausceptephas-Tigers/overview/news/7R0YQOWl
bjorerry baf94a4655 https://www.guilded.gg/privmerearpeas-Longhorns/overview/news/9loMDaPy
garrclov baf94a4655 https://coub.com/stories/4939656-descargar-dungeons-of-betrayal-gratuita-2021
vyrpala baf94a4655 https://coub.com/stories/4936406-descargar-backgammon-version-pirateada-2022
raimmad baf94a4655 https://coub.com/stories/4940814-descargar-ice-maze-version-completa-2021
gottgord baf94a4655 https://www.guilded.gg/emenavins-Wanderers/overview/news/7lxdZ2zl
halejan baf94a4655 https://www.guilded.gg/stolpigodfgas-Royals/overview/news/bR9oQgo6
fitden baf94a4655 https://www.guilded.gg/gaisysrefens-Sharks/overview/news/x6gJAaGl
kafravy a60238a8ce https://www.guilded.gg/boymemeris-Cantina/overview/news/16YAXxo6
idabhel a60238a8ce https://coub.com/stories/4882070-deep-russian-depression-2019
woojame a60238a8ce https://coub.com/stories/4879092-dreamhouse-the-game-2020
glenrhea a60238a8ce https://coub.com/stories/4881004-cardinal-quest-2
imrjam a60238a8ce https://coub.com/stories/4895886-the-dinosaurs-are-here-2020
yeabre a60238a8ce https://www.guilded.gg/ninmerorfes-Oilers/overview/news/Gl5wENJy
wellland ef2a72b085 https://wakelet.com/wake/w8KSD4cogbGm-ixI6gENB
ilyden ef2a72b085 https://wakelet.com/wake/TtiypubH2LHEXKFOXUNjd
sarregi ef2a72b085 https://wakelet.com/wake/3NiGz17YLP27APKYmoiwq
washqui ef2a72b085 https://wakelet.com/wake/XWztp82T3bakzCio9gH65
fabrgal ef2a72b085 https://wakelet.com/wake/bQMf_WSd9kQOFohCq3SpY
salisoot ef2a72b085 https://wakelet.com/wake/fm_cXQNoyrs5WP4E_YHZl
halemmo ef2a72b085 https://wakelet.com/wake/T5K4hNoWx_A8JIES4PyQ_
jannzab ef2a72b085 https://wakelet.com/wake/gfHUzqLmCKR2A6XfLw6-8
It is really a great and useful piece of information. I’m glad that you shared this useful info with us. Please keep us up to date like this. Thank you for sharing.
I have not checked in here for some time since I thought it was getting boring, but the last few posts are great quality so I guess I’ll add you back to my daily bloglist. You deserve it my friend 🙂
Fantastic website. Plenty of helpful information here. I¦m sending it to a few buddies ans also sharing in delicious. And obviously, thank you for your sweat!
yelhend 63b95dad73 https://marketplace.visualstudio.com/items?itemName=JIEGOJIAC.HD-Online-Player-2012-End-Of-The-World-Movie-Hindi-FULL
gayole 63b95dad73 https://marketplace.visualstudio.com/items?itemName=polina96.Dipak-Ghosh-Book-On-Mamata-Bengali-Version-Pdf-14-HOT
lynjymm 63b95dad73 https://marketplace.visualstudio.com/items?itemName=den1111.LINK-Download-Super-Phisher-10-Freel
goluran 63b95dad73 https://marketplace.visualstudio.com/items?itemName=lKuc9Il.Beatmania-Iidx-20-Tricoro-Hdd-HOT-Crack732
geroaviv 63b95dad73 https://marketplace.visualstudio.com/items?itemName=LionaXxX.Aqua-Energizer-Game-HOT-Full-Version-Free-Download
godwwha 63b95dad73 https://marketplace.visualstudio.com/items?itemName=1nardenoatsu.Olympus-Has-Fallen-Movie-Kickass-LINK-Download-In-Hindi
pheravi 63b95dad73 https://marketplace.visualstudio.com/items?itemName=garisan.PORTABLE-Disk-Storage-Analyzer-PRO-V3048-paid-Patched-Apk
eldwake 63b95dad73 https://marketplace.visualstudio.com/items?itemName=lllelolnl.G-Nettrack-Pro-Apk-INSTALL-Cracked-Ipak
ylaral 63b95dad73 https://marketplace.visualstudio.com/items?itemName=freefresh.Stocks-Vector–CC-Vision-Car-Special-V18
reaeidd 63b95dad73 https://marketplace.visualstudio.com/items?itemName=Berma4ok.Kaabil-Tamil-Movie-Hd-Free-Download-burlben
oliemann 9ff3f182a5 https://www.kaggle.com/code/vilhodove/easy2convert-raw-to-jpg-pro-crack-best
shelau 9ff3f182a5 https://www.kaggle.com/code/lasmutera/link-traktor-3-le-bcd3000-serial-number
salmwall 9ff3f182a5 https://www.kaggle.com/code/nonpgrabexspas/the-kabhi-alvida-naa-kehna-2-full-m-link
yakjame e494b75024 https://marketplace.visualstudio.com/items?itemName=calimope.BeatJam-FREE-Keygen
Thanks for posting about page builders. I have seen them in use in a former company that I used to associate with but never thought about bringing a page builder to my blogging experience.
I suppose that if you are using flash and a page builder, it might be a security risk though. What do you think?
Do you build landing pages with the page builder or do you use Leadpages or ClickFunnels?
Thanks for the comment, Jon!
Any plugin increases your security risk. I use a security plugin with antivirus and firewall to protect my blog and also backup my site every week as a precaution.
To answer your other question, I use a pagebuilder for my landing pages. Elementor has a layout section in the page settings. If you select “Elementor Canvas,” your headers and footers will not show. This works well for landing pages.